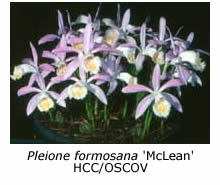
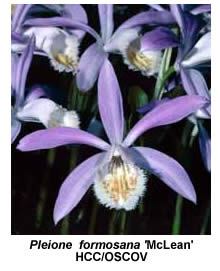
The genus Pleione, long neglected by most orchid growers, has become popular in recent years thanks to a few people who have specialized in its culture and breeding. The genus, comprising about ten species, originates in Nepal, northern India, Bhutan, Burma, southern China, Laos and Thailand. The various species are found growing at altitudes between 1000 and 3000 m in forests with a high summer rainfall and a cold, dry winter. Most species flower in spring, although P. praecox is exceptional as it flowers in autumn. The flowers, borne singly, are similar to cattleya flowers in shape. They measure up to 100 mm across and are borne on stems up to 180 mm tall. The most commonly grown species is Pleione formosana (syn. P. bulbocodioides), which has flowers varying from white to mauve in colour. P. formosana ‘White Beauty’ and ‘Clare’ have white flowers while P. formosana ‘Blush of Dawn’ and ‘Gladysdale’ are mauve. Commonly grown hybrids include Pleione Tongariro, P. Versailles and P. Shantung.
I have successfully grown P. formosana and its hybrids in Melbourne for many years and my method of cultivation is described below. Each bulb lives for only one year, in that time producing one or more replacement bulbs or bulbils for the following year. The flowers appear in spring, followed by the leaves, which grow throughout summer and develop new bulbs at their bases. In autumn the leaves first turn yellow and then brown, before they fall from the dormant bulbs. Re-potting should be carried out during winter while the bulbs are still dormant. The bulbils that grow from the top of the old bulbs should first be removed. Some may have already fallen onto the top of the old mix. These bulbils, each about the size of a match, may still retain their solitary strap-like leaf. These leaves often have a curl at their end, which catches in everything, so I usually rip the tip off with my thumbnail. The bulbils are then saved for re-potting at a later date.
The larger bulbs are next shaken free of their old compost. The old bulbs will be spent and withered but will have one or two new, firm bulbs attached. Carefully separate the bulbs and discard the old ones. The new ones will still have a clump of roots attached. I sever these roots close to the bulb with my trusty thumbnail before re-potting, which may be carried out immediately or deferred for several weeks. The bulbs may be safely stored for a month or two if kept cool and dry. I prefer to re-pot them before they show signs of new growth. Pleiones are best potted in a general-purpose garden compost or potting mix. I do not use orchid potting mixes, because they drain too freely and don’t retain enough moisture. A simple mix of leaf mould and river sand is quite satisfactory. I sort the new bulbs by size before re-potting. The larger ones (those most likely to flower) are planted in pots for exhibition or sale, while the medium-sized and small bulbs are planted in foam boxes for ease of handling. These pots or boxes are half-filled with compost and then a little slow-release fertilizer is added before they are topped up with compost. The bulbs are next pressed into the compost to one third of their depth. A light watering helps to settle the bulbs. No further watering is needed until the new growth appears, although rain will do no harm. Pleiones are best grown under 50% shade cloth. Protection from blackbirds may be needed to prevent them from uprooting the bulbs in their search for worms. The bulbils may be planted in rows in foam boxes or simply sprinkled on top of the compost.
The frequency of watering should be gradually increased as the flowers and new growths develop. Take care not to disturb the bulbs while watering, as it’s easy to damage the new roots that are growing from the base of the new growths. Regular watering and occasional liquid fertilizing during summer will ensure the development of large bulbs for the next year.